|
|
Care & Feeding of the Trumpet
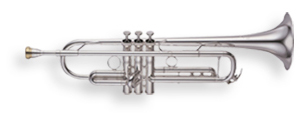
The trumpet has two basic pieces:
- The mouthpiece;
- The instrument.
The instrument is composed of the valves, the slides, and the body of the horn.
Assembly
- The basic assembly of the trumpet is quite easy and consists simply of placing the
mouthpiece into the mouthpiece receiver on the instrument. Take care not to twist
the mouthpiece as you insert it into the receiver; you also don't want to push it
in too hard, tap or bang on it or the mouthpiece might get stuck.
The Valves
- There are three valves, or pistons, on a trumpet; the first, second and third. The
first valve is closest to the player holding the horn and the third valve is closest
to the bell. The second valve is in-between the first and third.
- At the top of each valve is the finger button, which is screwed onto the valve stem.
Next is the top valve cap, which keeps the valve in place in its correct part of
the valve casing on the body. Underneath the top valve cap is the spring barrel
which holds the spring that allows the valve to spring back up when it has been
pushed down. Underneath the bottom of the spring and sticking out of two slots in
the side of the spring barrel is the valve guide, which is usually made out of white
plastic. This important part of the valve keeps the valve in the correct position
when it's in the valve casing. The spring barrel is attached to the actual valve
itself. Each valve has three holes or passageways going through it, with one port
at each end of each hole. With the help of the valve guides these holes line up
with the different tubes attached to the valve casing on the body so that the air
or sound can pass through the trumpet correctly. At the bottom of each section of
the valve casing is a bottom valve cap that protects the bottom of the valve and
prevents oil from dripping out.
- While it looks like it would be fun to take all the valves apart and put them back
together, it's best not to do so. If you have taken a valve out of the trumpet,
be careful not to drop or bang it because it can be bent quite easily. Also, if
you set one down, be careful to put it in a place where it cannot roll or be accidentally
bumped. Most valves have a number on the spring barrel so you can tell whether they're
number one, two or three.
Oiling the Valves
- It is best to choose a time to oil the valves when there is not a lot of activity
around you. For example, it might be better to oil them at home before band instead
of right before band when there are a lot of other students running around who could
bump into you. If you happen to drop a valve it will probably get bent and not work,
so you need to be careful when you do this.
- You only need to oil one valve at a time. First remove the cap from your bottle
of valve oil and place it nearby where you can reach it. Holding the trumpet in
your left hand with your fingers wrapped around the valve casing, unscrew the top
valve cap counter-clockwise and pull the valve out far enough so that you can see
the actual valve itself. Holding the trumpet so that the valve stays pulled out
but won't fall out, place a couple drops of oil on the valve, then push the valve
back into the valve casing. Without pressing down the finger button, twirl the valve
clockwise or counter-clockwise until you feel the valve stop and the valve guide
click into its slot inside the valve casing. Carefully thread the top valve cap
clockwise, push the valve up and down a few times to distribute the oil, and you're
all done and ready to do the next one.
- The valves don't need to be oiled every time you play, but you should oil them two
or three times a week or whenever they feel sluggish.
The Slides
- There are four slides on a trumpet. Each valve has a corresponding slide, so there
is a first slide, a second slide and a third slide. The first slide is connected
to the first valve casing and points toward the player. The second slide is connected
to the second valve casing on the right-hand side of the horn as the player holds
it. The third slide is connected to the third valve casing and points in the same
direction as the bell. The fourth or final slide is the tuning slide. It is larger
than the other three and is connected to the mouthpipe and the third valve casing.
The mouthpipe, or leadpipe as it is sometimes called, is the long, straight tube
the runs along the upper right side of the trumpet as the player holds it. The part
of the mouthpipe closest to the player ends in the mouthpiece receiver where the
mouthpiece goes. The other end of the mouthpipe ends in the tube that accepts the
upper part of the tuning slide. Near this end of the mouthpipe, on top, is the finger
hook for the right little finger.
- On the tuning slide and usually on the third slide as well there is a water key
near the bottom of the curved part, commonly called a spit valve. Playing the trumpet
stimulates the salivary glands and some saliva inevitably builds up inside the instrument
and starts to make a gurgling sound. When this happens we need to release the saliva
by opening the water keys and blowing on the mouthpiece. We don't need to buzz like
we do when we play the trumpet; we just need to blow. If there is an accumulation
of water in the third slide, we need to hold the third valve down when we blow and
have the third slide water key open, otherwise the air doesn't go through the third
slide.
- There's often some valve oil which can stain a rug or carpet mixed in with the saliva
so it's important to keep in mind whose floor we're emptying our water keys on.
On the linoleum in the band room is probably okay, but you might want to think twice
before emptying the water keys on your mom's new carpet. Some players will have
an old towel or tee shirt to place on the floor just for this purpose.
Cleaning the Trumpet
Cleaning and Polishing the Outside
- Just use a clean dry cloth to keep the outside of the instrument clean. There are
lacquer polish cloths available that are okay to use which are treated with a wax
that cleans and shines and won't hurt the finish of the trumpet. If you are careful,
you can also spray a polish such as Pledge&#reg; lightly on a cloth and then use
the cloth to polish and remove any stubborn stains on the body of the horn.
- If the instrument is silver-plated instead of brass-lacquered, you can use a silver
polish cloth to keep the outside shiny. Before you polish a silver horn, especially
if you haven't given it a bath recently, take the time to wipe the outside off with
a cloth lightly dampened with rubbing alcohol. This removes the oils of the perspiration
from your hands and any dirt that might be on the surface and makes the actual polishing
go a lot quicker.
Helpful Hints and Reminders
- Pliers and trumpets don't go together – ever! If your mouthpiece happens to get
stuck for any reason, DO NOT use pliers to try to get it loose, and just as important,
DO NOT let your dad try it either. Depending on how stuck it is, using the pliers
can scratch and damage the mouthpiece at the very least. In worse cases the mouthpiece
won't free up but the mouthpipe will start to break away off the body of the trumpet.
In the worst cases the person trying to “unstuck” the mouthpiece can pull the entire
mouthpipe off the body of the trumpet, and the mouthpiece is still stuck!
- If and when the mouthpiece gets stuck, first ask your band director for help. Most
band directors have a tool called a mouthpiece puller that can remove a stuck mouthpiece
quickly and easily without damaging the mouthpiece or the trumpet. If the band director
cannot help you, then take your trumpet to your local band instrument store and
ask for their help.
- When you're holding or playing the trumpet, don't put your right little finger,
the “pinky” finger, in the finger hook on the mouthpipe. Instead, place your little
finger on top of the hook. In order to do this you have to raise your entire hand
just a little bit, and what it does is gives your first, second and third fingers
a better angle to push the valves down.
- When your little finger is in the hook your other fingers are fairly flat when they
touch the valves. It's hard to push the valves straight down in this position; instead
they get pushed partly sideways at the same time they are being pressed down. When
the little finger rests on top of the finger hook then the other fingers have some
arch to them and can push the valves down straight every time. This makes the valves
work better and faster.
- So why is the finger hook there, you ask? You need to use the finger hook at times
when you have to hold the trumpet with just your right hand. This could be when
you need to keep playing while you turn a page of music, or it could be when you're
playing and you need to put a mute in the trumpet or take one out. With your little
finger in the hook you can still work the valves while you hold the trumpet with
just your right hand.
- When you are placing the horn back in the case do not store your band method book
on top of the instrument. Most trumpets and trumpet cases are designed these days
so that padded inside of the lid comes right down on top of the trumpet, leaving
no room for a book. Forcing a book to fit by pushing down on the lid to close it
can damage the instrument.
- Keep your trumpet safe. It should only be "on your face or in the case!" Do not
leave it on your chair, the sofa, the table, the floor, or the piano. If a trumpet
is dropped it can cause extensive damage and expensive repair.
- Always carry your case with the lid or top side of the case toward your body. This
way, if the case were to unexpectedly open for any reason, you would have the chance
to pull the case against your body to prevent the instrument from falling out. If
the lid is facing away from you and the case opens there is no way for you to keep
the instrument from falling out.
- Whether the information is on a card inside the case, a label or an ID tag, make
sure your instrument has identification on it showing that it belongs to you. Almost
all band instruments have their own unique serial number on the body of the instrument
so you shouldn't mark the instrument itself, but do have proof of ownership somewhere
inside or on the case.
|
|
